The RASONRunnerSetup.exe installer must be run first to add RASON Solve under External Tools in Microsoft Power BI and add the RASON tab in Microsoft Excel. See the previous chapter on installation for more information on how to install RASON Runner.
Step 17: Exporting Model to Excel to be solved in Excel.
In addition to exporting results, the full model may also be exported to Excel, where it can be executed. This enables users to run the model, explore different scenarios, and analyze results without returning to Visual Studio Code.
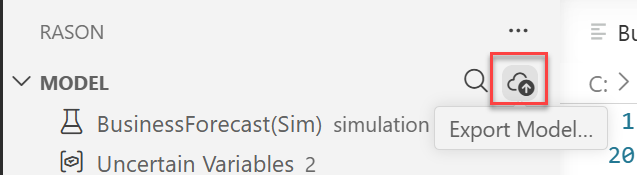
To export a model to Excel, return to the RASON Desktop extension in Visual Studio Code. First refresh the Excel workbooks, then select the BusinessForecastExample.json tab and click the Export Model button in the Visual Studio Code extension interface. Note that RASON Desktop only supports exporting models to previously saved workbooks.
Figure 26: Export RASON Model to Excel
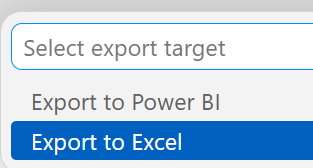
Then select Export to Excel.
Figure 27: Select Export to Excel
Then select BusinessForecastExample.xlsx.
Figure 28: Select "BusinessForecastExample.xlsx"

Notice the messages in Visual Studio Code indicating that the export was successful.
Figure 29: Model export successful

Once exported, the model can be executed directly within Excel, allowing users to analyze results and explore different scenarios without ever leaving Excel.
Step 18: Solve the model in Excel
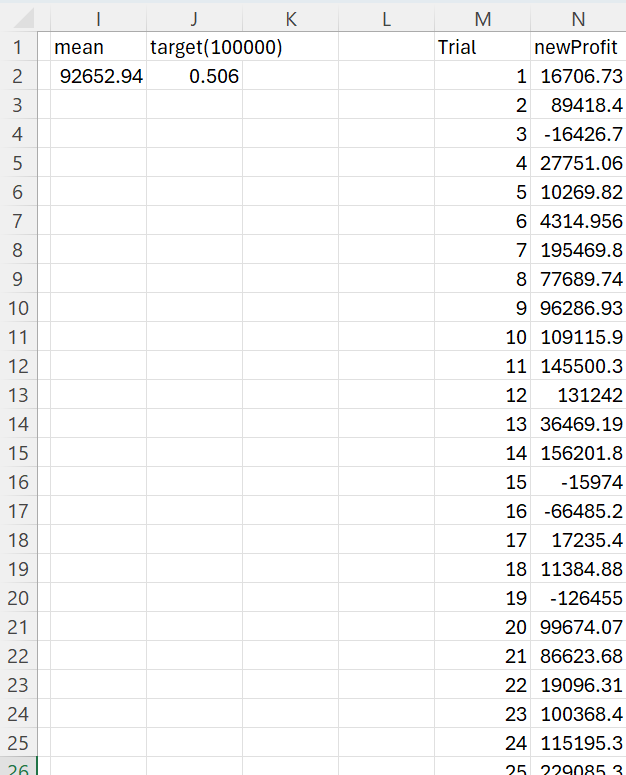
Click back to Excel, then open BusinessForecastExample.xlsx. The simulation is executed again, generating updated trial and summary results for all outputs.
Figure 30: Click RASON - Solve to solve the model

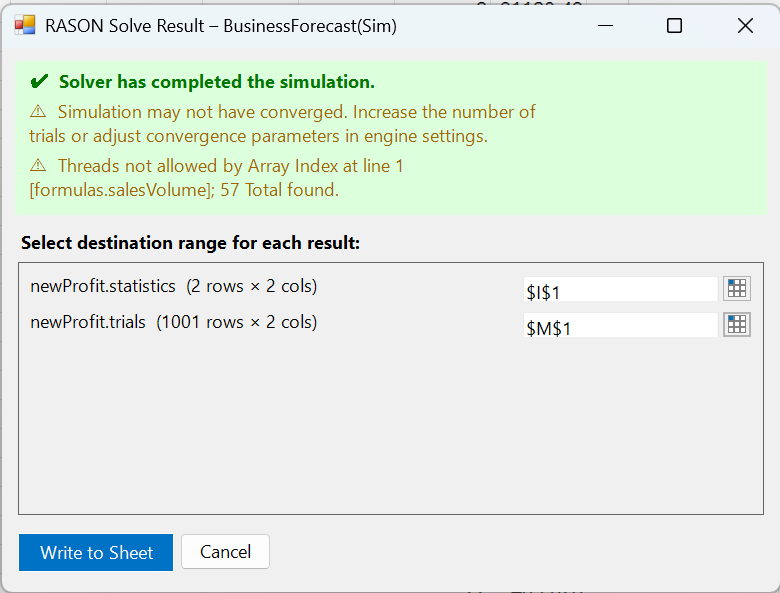
When the model is solved from Excel using RASON Runner, the RASON Solve Result dialog displays the simulation status and available outputs. In this example, the message confirms that the simulation was completed. The dialog also lists each result (dataframe) returned by the model, in this case the statistics and trial values for the newProfit uncertain function.
For each result, select a destination range in the Excel workbook where the values should be written. The listed dimensions indicate the size of the output range required. For example, “newProfit.statistics” requires a 2-row by 2-column range, while “newProfit.trials” requires a 1001-row by 2-column range. After selecting the destination ranges, click Write to Sheet to insert the results into the workbook.
Figure 31: RASON Solve Result – BusinessForecast dialog
Step 19: Viewing Exported Results in Excel
After executing the model in Excel, the updated tables reflect the results returned from the RASON.net server. These results can be further explored using Excel visuals to better understand the distribution of outcomes and the impact of uncertainty on business performance.”
Figure 32: Updated results in Excel
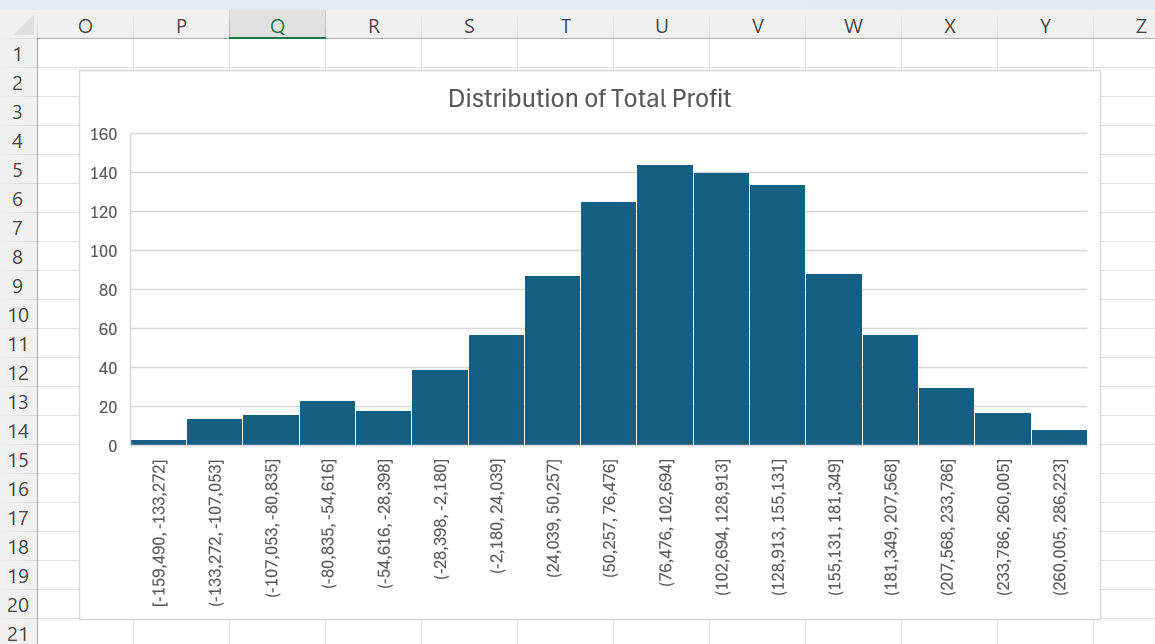
A simple Excel visual is shown in the figure below, displaying histograms generated from the trial values for the uncertain function. Total Profit. Each bar in the histogram represents the frequency of outcomes across simulation trials.
Figure 33: Simple Excel Visual
This example demonstrates the complete workflow of developing a model in RASON, exporting it to Excel using RASON Desktop, and executing it within a workbook. The results returned from the RASON.net server can be viewed and analyzed directly in Excel, enabling users to integrate simulation models into their reporting and decision-making processes.
This completes the simulation model export walkthrough. The steps follow the same general workflow used for the optimization model: open and solve the model in RASON Desktop, review the generated results, export those results or the full model to Power BI or Excel, and then run or analyze the model directly from the target application. The main difference is that simulation models may return additional outputs such as trials, statistics, percentiles, or target results, giving users more ways to evaluate uncertainty and compare possible outcomes. As with optimization models, runtime users can work with exported simulation models in Power BI or Excel, while edits to the RASON model itself should be made in RASON Desktop within Visual Studio Code.